Deploying HTTP/2 and Strong TLS with Nghttp2 and Nginx
HTTP/2 is here. Well...kinda. All major browsers either currently support or have publicly announced intentions to support HTTP/2. Finding server software that supports HTTP/2 is a little trickier though. Nginx and Apache, the two biggest server applications do not currently support HTTP/2.
What's a web geek to do? Fortunately, a hot, experimental HTTP/2 server is currently available and ready for use. It has been around for a little over a year and I finally decided to take it for a spin. In fact, my site is offering an HTTP/2 connection via Nghttp2 right now.
Getting the suite of Nghttp2 applications up and running was surprisingly easy, especially given that there is little information out there beyond the documentation itself. In this article, I will discuss my experiences with Nghttp2 and HTTP/2, as well as dive into some instructions for installing and configuring the software.
What is Nghttpx?
Nghttp2 is a suite of HTTP/2 applications implemented in C. When you install the Nghttp2 package, you get a client, server, proxy, and related tools. Nghttpx is an HTTP/2 proxy that I will focus on in this article. I decided to go with the proxy over the server implementation because I wanted to recycle the work I've done to configure Nginx for serving my site, rather than having to learn how to configure a new piece of server software.
I've implemented Nghttpx as a reverse proxy. Requests to my website on port 443 are handled by Nghttpx, which proxies the request to Nginx. Nginx ultimately handles all of the request routing to return the requested files. In turn, it hands the response off to Nghttpx which ultimately prepares the HTTP/2 response for the client.
I have been excited about HTTP/2, but have worried about potential difficulties of supporting HTTP/2, HTTP/1.1, and SPDY. Nghttpx takes away some of this hassle in that it'll work with the following protocols by default:
- HTTP/2
- HTTP/2 draft 16
- HTTP/2 draft 14
- SPDY 3.1
- HTTP 1.1
More modern browsers that already support HTTP/2 (Chrome, Firefox) can connect using HTTP/2, while other browsers and clients (Safari, cURL) can still establish a connection with SPDY or HTTP/1.1. Deployment is uncomplicated and simple.
A Solid TLS Configuration
One of my hesitations with server software other than Nginx is that I really enjoy all of the TLS configuration options that Nginx offers. It implements the widest array of TLS configuration options that I am aware of. If I used a different server to get HTTP/2, my biggest concern was having to trade an "A+" TLS configuration for the features of HTTP/2 (until Nginx itself supported HTTP/2 of course).
To my surprise, Nghttpx's TLS configuration is just as powerful as Nginx's. Moreover, the default Nghttpx TLS configuration will produce an "A" rating on SSL Labs. Let me repeat that, without any special configuration, Nghttpx provides a best in class TLS configuration out of the box. In fact, the other TLS configuration required was the path to my private key and public certificate chain.
To contextualize this, SSL Pulse's June 11, 2015 data suggests that only 18.8% of ~146k top rated Alexa sites tested received an "A-" rating or higher from SSL Labs. A site with less that an "A-" is characterized as having "inadequate security" due to at least one major flaw in the TLS configuration. It's noteworthy for a piece of software to ship with such solid out of the box TLS configuration. Efforts like these help make it much more difficult for implementors to naively implement less than ideal TLS configuration.
The TLS defaults for Nghttpx are:
- Protocol version: TLSv1.2, TLSv1.1
- The default cipher suites are:
ECDHE-RSA-AES128-GCM-SHA256:ECDHE-ECDSA-AES128-GCM-SHA256:ECDHE-RSA-AES256-GCM-SHA384:
ECDHE-ECDSA-AES256-GCM-SHA384:DHE-RSA-AES128-GCM-SHA256:DHE-DSS-AES128-GCM-SHA256:
kEDH+AESGCM:ECDHE-RSA-AES128-SHA256:ECDHE-ECDSA-AES128-SHA256:ECDHE-RSA-AES128-SHA:
ECDHE-ECDSA-AES128-SHA:ECDHE-RSA-AES256-SHA384:ECDHE-ECDSA-AES256-SHA384:
ECDHE-RSA-AES256-SHA:ECDHE-ECDSA-AES256-SHA:DHE-RSA-AES128-SHA256:DHE-RSA-AES128-SHA:
DHE-DSS-AES128-SHA256:DHE-RSA-AES256-SHA256:DHE-DSS-AES256-SHA:DHE-RSA-AES256-SHA:
!aNULL:!eNULL:!EXPORT:!DES:!RC4:!3DES:!MD5:!PSK- OCSP stapling is turned on by default
- Secure connections are the default, even though HTTP/2 does not require TLS
- No static Diffie-Hellman parameters are generated by default as DHE key exchange is not supported unless you provide your own
Basically, if you implement a secure connection in Nginx today, you need to take care to configure these things specifically. If you don't, you may find yourself susceptible to a TLS-related vulnerability. Nghttpx gives you this security for free.
Another really welcome surprise was the transparency about OCSP when I fired up the server. After starting the server, I found the following in my logs:
7/Jun/2015:21:46:00 -0400 PID32679 [NOTICE] Listening on 0.0.0.0, port 443
17/Jun/2015:21:46:00 -0400 PID32679 [NOTICE] Renew ticket keys: main
fetch-ocsp-response (using OpenSSL 1.0.1f 6 Jan 2014)
sending OCSP request to http://gv.symcd.com
/etc/ssl/usr-certs/tollmanz.crt: good
  This Update: Jun 15 00:50:23 2015 GMT
  Next Update: Jun 22 00:50:23 2015 GMT

verifying the response signature
verify OK (used: [u'-VAfile', u'/tmp/tmpxUTr9K/issuer.crt'])
The processes behind OCSP can be a bit of a black box at times because of the lack of visibility. I really liked that Nghttpx told me that it was making the request, the result of the request, and when the next request would occur. Oh, and guess what? You can configure that request interval.
If it isn't apparent, I was very pleased with the TLS configuration. At best, I thought I'd have to configure it to my liking. At worst, I thought I wouldn't be able to configure it as desired. In the end, I got a perfectly configured server for TLS out of the box.
The Joys of HTTP/2
The whole reason for this exercise was to begin playing with HTTP/2. I have been using SPDY for quite some time and was familiar with that experience, but I wanted to see how HTTP/2 compared. In particular, I was excited to test server push (the server directly pushes a resource to a client without first processing HTML), which was never implemented in SPDY via Nginx.
My site was normally producing a Start Render at ~1 second with a Speed Index of ~1100.
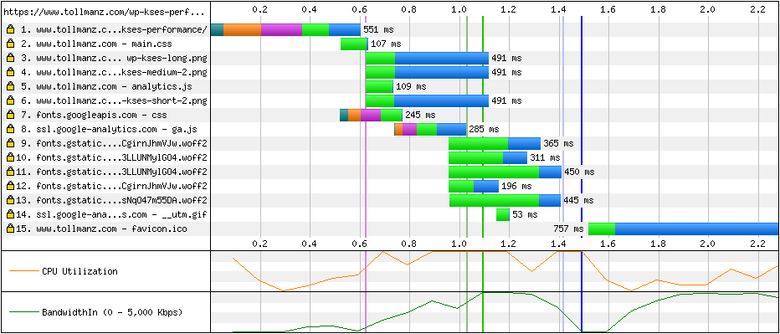
Updating to HTTP/2 appeared to move things about 100ms, giving me a Start Render of ~900ms and Speed Index of ~1100.
After running these baseline synthetic tests, I turned to implementing server push for my main CSS. Server push is implemented via a header. I added the following header to each HTTP/2 response:
add_header Link '</css/main.css>; rel=preload; as=stylesheet';When the client sees this header, it immediately starts downloading main.css (unless the client blocks it). This unfortunately did not change the Start Render or Speed Index in any meaningful manner.
Looking at that waterfall, the interesting thing is that the CSS doesn't even show up on the waterfall. This had me confused. I wanted to see if there was another way to visualize what was happening. Within the suite of Nghttp2 tools, the nghttp HTTP/2 client is included. This application allows you to make HTTP/2 requests and includes a number of helpful features. One such feature is a --stat flag. I requested my site using this command and flag when I utilized server push and when I didn't:
# With server push
nghttp https://www.tollmanz.com --stat
 id  responseEnd requestStart  process code size request path
 13     +8.37ms       +212us   8.16ms  200   9K /
  2     +8.80ms *    +2.26ms   6.54ms  200   7K /css/main.css

# Without server push
 id  responseEnd requestStart  process code size request path
 13     +7.36ms       +217us   7.14ms  200   9K /
These requests are like making curl requests against a site, except it's using HTTP/2. What you should notice is that with server push is that it automatically pushed the CSS. Without server push, I did not get the CSS. Server push was clearly working!
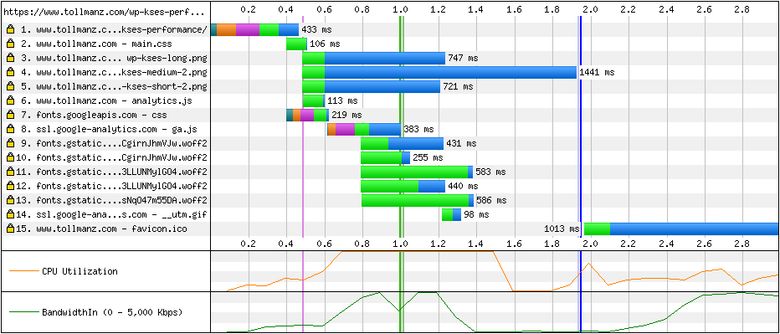
Using the --har flag, I could save the request to a HAR file and use a HAR viewer to visualize what was happening. Using the Chrome HTTP Archive Viewer extension, I could compare the two experiences:

The server push version is at the top of the image with the no server push version at the bottom. What do you notice? The main.css file begins downloading much quicker in the server push version. You'll see that the HTML needs to download before the main.css file is requested in the no server push version. Again, proof that server push is doing something!
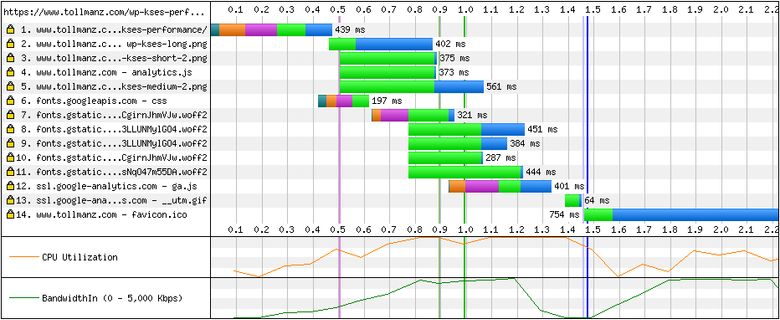
One thing that bugged me about my waterfall is that I was able to open a single TCP connection for most resources, except for the fonts that were hosted with Google Fonts. This bothered me. I wondered what would happen if I moved these fonts to my domain. I used webfont-dl with the recommendations from Mathias Bynens to download the fonts to my site. The results were very nice:
Start Render fell another 200ms to ~700ms, with the Speed Index following suit at ~720. Eliminating that Google Fonts connection was huge. Being able to reuse the already established TCP connect pays off in a major way.
This initial exploration was exciting. I am looking forward to figuring out how to properly handle server push. Right now, I'm pushing my CSS no matter whether you have it in cache or not. This is a problem. Server hints apparently help solve this, but are not as performant as server push because there is still a round trip involved.
I also look forward to experimenting with prioritization. I couldn't find good resources on this yet, but hope to figure it out soon.
Now, that I've geeked out on this, you should too. Let's take a look at how to get a similar setup for your own site.
Installing Nghttp2
Nghttp2 was surprisingly easy to install. It requires compiling the software from source, but given that it's a relatively modern application, it mostly just worked. Fortunately, Tim Nash did much of the hard work before me and I used his guide as a starting point. My installation experiences were similar to his, but I fortunately was using Ubuntu 14.04, which smoothed out some of the pain points that he experienced. In my guide, I'll cover not only installation, but also configuration of Nghttpx as a proxy for nginx.
The Dependencies
As with most installations, you need to get the dependencies handled first. I began by installing the dependencies recommended by nghttpx and Tim Nash. In addition to these dependencies, I needed to install python3.4-dev, g++, g++-mingw-w64-i686, git, and python3-setuptools to satisfy additional dependencies on my server.
sudo apt-get install make binutils autoconf automake autotools-dev libtool pkg-config zlib1g-dev libcunit1-dev libssl-dev libxml2-dev libev-dev libevent-dev libjansson-dev libjemalloc-dev python3.4-dev g++ g++-mingw-w64-i686 git python3-setuptoolsAlong with these dependencies, I needed to install cython, C extensions for Python. This install process requires Python 3. With Python 2 being the default on Ubuntu 14.04, I needed to install tooling specifically for Python 3 and use that throughout. To get cython installed, I needed to install easy_install3, which is specific to Python 3. That allowed me to use pip3.4, the Python 3 version of pip, to install cython. I spent a lot of time trying to get these simple steps right:
sudo easy_install3 pip
sudo pip3.4 install -U cython # Takes a while
I then created a directory for compiling sources in the next steps.
mkdir ~/srcWith the basic dependencies in place, I set out to install a higher level dependency, Spdylay. This application is another project from Tatsuhiro Tsujikawa and serves as the foundation for Nghttp2. Essentially, Spdylay is to SPDY as Nghttp2 is to HTTP/2.
Installing Spdylay involved the familiar download, configure, and make process for compiling from source:
git clone https://github.com/tatsuhiro-t/spdylay.git ~/src/spdylay
cd ~/src/spdylay
autoreconf -i
automake
autoconf
./configure
make
sudo make install
Contrary to Tim's experience, this process left me with the new spdyd bin, instead of spdylay. When attempting to run this command, I was presented with an error message suggesting that there were broken links to shared libraries. Borrowing from Tim, I located the libraries with:
sudo updatedb
locate libspdylay.so.7
Then used the resulting information to repair the links:
sudo ln -s /usr/local/lib/libspdylay.so.7 /lib/x86_64-linux-gnu/libspdylay.so.7
sudo ln -s /usr/local/lib/libspdylay.so.7.2.0 /lib/x86_64-linux-gnu/libspdylay.so.7.2.0
sudo ldconfig
Note that the so files that you search for and link may be different in your case. You can use the technique shown above to search for the so and the handle the resulting symlinking using the paths that you discover.
With Spdylay installed, I could turn my focus to installing Nghttp2.
Nghttp2
Installing Nghttp2 was similar to Spdylay; however, there is one really important gotcha that took me some time to work out. When configuring Nghttp2, you must do so with Python 3, not Python 2. If your default python command is not showing a Python 3 version, you will need to make sure that you set the PYTHON environment variable to the path to your python3 binary (i.e., found with which python3) in order to configure with the right Python version. The installations steps below use the path to my Python3 binary:
git clone https://github.com/tatsuhiro-t/nghttp2.git ~/src/nghttp2
cd ~/src/nghttp2
autoreconf -i
automake
autoconf
./configure PYTHON=/usr/bin/python3
make
sudo make install
Similar to the Spdylay experience, attempting to invoke nghttp (e.g., nghttp --version) was met with warnings about broken links. To fix this, I used the same technique presented above:
sudo updatedb
locate libnghttp2.so.14
With the paths to the right libraries, I repaired the links:
sudo ln -s /usr/local/lib/libnghttp2.so.14 /lib/x86_64-linux-gnu/libnghttp2.so.14
sudo ln -s /usr/local/lib/libnghttp2.so.14.0.2 /lib/x86_64-linux-gnu/libnghttp2.so.14.0.2
sudo ldconfig
Again, note that your broken links might be different than mine. This technique just gives you the tools needed to fix the issue.
To make sure I had things installed correctly, I tried to invoke the versions of the different pieces of software that I installed:
nghttp --version
nghttpx --version
nghttpd --version
h2load --version
If you get version numbers and no errors from those commands, things are in great shape and it's time to start configuring Nghttpx.
Setting up Nghttpx
I should note at this point, I was focused on Nghttpx only as I wanted to implement the proxy, not the server or the client. My experiences below will only address Nghttpx.
The quick way to start running Nghttpx is to use the command line application with arguments and flags. I initially got things started with:
nghttpx \
  --frontend=*,443 \
  --backend=localhost,8080 \
  --private-key-file=/path/to/key.key \
  --certificate-file=/path/to/cert.crt
This initialized a proxy listening to port 443 and proxying to localhost:8080, with my certificate and private key for tollmanz.com. Simply running this allowed me to establish an HTTP/2 connection to my site and produced an "A" rating with SSL Labs.
While there is a "daemon" option for the command (i.e., --daemon), I wanted to be able to use the service command to manage the application. After searching around for ways to create my own init script, I found that one was already created for me when installing the software. All I needed to do was move it into the correct location:
sudo ~/src/nghttp/contrib/nghttpx-init /etc/init.d/nghttpxWith that taken care of, I could start Nghttpx with:
sudo service nghttpx restartPretty awesome; however, I noticed that this did not start the application as a daemon. To correct this, I had to update the init script. This was accomplished by adding --daemon to the DAEMON_ARGS variable in the init script (I will likely submit a patch for this because I think this should be the default).
Now that I could control Nghttpx with service, I needed to finish things up by creating a configuration file. With the service command, I cannot pass arguments to the application. Instead, the application will read the configuration from the default /etc/nghttpx/nghttpx.conf location. I created this file and added my configuration:
frontend=*,443
backend=localhost,8080
tls-proto-list=TLSv1.2
private-key-file=/path/to/key.key
certificate-file=/path/to/cert.crt
accesslog-file=/var/log/nghttpx/access.log
errorlog-file=/var/log/nghttpx/error.log
add-x-forwarded-for=yes
no-host-rewrite=yes
Note that I also created the log files as that were not created automatically:
sudo mkdir /var/log/nghttpx
sudo touch /var/log/nghttpx/access.log
sudo touch /var/log/nghttpx/error.log
Most of the configuration is self-explanatory, but I need to highlight a few things. I added add-x-forwarded-for=yes in order to receive the clients real IP address in my logs; otherwise, every request is reported as 127.0.0.1.
As I was trying to use my current Nginx config, it was import that the host data for the HTTP request was preserved. I needed the true host value to handle things like redirecting https://tollmanz.com to https://www.tollmanz.com. This was tricky to get right until I found the no-host-rewrite=yes configuration value. With that configuration in place, the true host value was passed to my Nginx configs and they continued to work as they previously did.
With this configuration in place, I could control Nghttpx like other applications on my server. sudo service nghttpx start to start and sudo service nghttpx stop to stop!
Nginx Behind the Proxy
With Nghttpx proxying to Nginx, I needed to make sure Nginx responded to requests to port 8080 properly. I also used Nginx to set some headers to improve the TLS setup.
My Nginx configuration was simplified to:
server {
    listen         8080 default;
    server_name    www.tollmanz.com;
    root           /srv/www/tollmanz.com/;
    index          index.html;

    # Add long expires headers to all assets
    location / {
        expires 365d;
    }

    # Enable HTTP Strict Transport Security (HSTS)
    add_header    Strict-Transport-Security "max-age=15552000; includeSubDomains; preload";

    # Set a CSP policy
    add_header    Content-Security-Policy "default-src 'self' https:; font-src https://fonts.gstatic.com; img-src 'self' https:; style-src 'self' https: https://fonts.googleapis.com; script-src 'self' https: https://ssl.google-analytics.com";

    # Pin the certs
    add_header    Public-Key-Pins 'pin-sha256="j+rQEAhMMJvg6xmn0rzlpe4WZgr7dz9tc7bVhUTsY4E=" pin-sha256="klO23nT2ehFDXCfx3eHTDRESMz3asj1muO+4aIdjiuY="; pin-sha256="6X0iNAQtPIjXKEVcqZBwyMcRwq1yW60549axatu3oDE="; max-age=0; includeSubDomains';

    # Add block directives
    include "/etc/nginx/conf/block.conf";

    # Add more security measures
    include "/etc/nginx/conf/security.conf";
}

server {
    listen 8080;
    server_name tollmanz.com;
    return 301 https://www.tollmanz.com$request_uri;
}

server {
    listen 80;
    server_name tollmanz.com;
    return 301 https://www.tollmanz.com$request_uri;
}
The important parts of this is that I'm listening to requests to tollmanz.com:8080 and tollmanz.com:80 to redirect it to www.tollmanz.com:8080. This makes sure that all requests will resolve to the secure www.tollmanz.com. When I was serving content directly from Nginx, I was listening to 443 instead of 8080. I mostly just changed the ports and this worked. I had additional TLS configuration in there, but that was no longer needed because the TLS termination is handled by Nghttpx, not Nginx.
I then set my HSTS, CSP, and HPKP headers. The HSTS header brings my SSL Labs rating to an "A+", while the CSP header blocks resources that do not conform to my resource rules. Finally, the HPKP header locks my site to specific certificates. With this in place, I was able to successfully serve my site using Nghttpx as a reverse proxy for Nginx over HTTP/2.
Conclusion
HTTP/2 is going to be awesome. After playing with it for only a few hours, I am excited about the future of the web. Browser vendors are aggressively preparing for this future and with software like Nghttp2, we can already start experimenting with this exciting technology. I am also impressed by Nghttp2 itself. It was easy to install, well documented, and ships with important defaults. I encourage you to start experimenting with HTTP/2 yourself.